

Disable Administrative Shares from Windows Server
When multiple computers are connected to a network, Windows automatically creates Administrative Shares to let remote access for various operations. This enables Administrators and back up technicians to manage services, effectively. In some cases, such shares can be a potential security threat for your system. As such, information technology is meliorate to remove Administrative Shares from Windows Server. Here is how to get rid of them.
Disable Authoritative Shares from Windows Server
If you are not aware, these special shared resources are non visible in 'File Explorer' or under 'This PC' section. To view them, you'll have to bring 'Share Folders' tool into use. The tool tin be constitute readily under 'Computer Management'. Then, to remove the special shared resources and prevent them from being created automatically,
- Employ Registry
- Apply Ultimate Windows Tweaker
You can recognize an administrative share when a bulldoze letter or folder proper name has a '$' sign attached at the end. Instance,
- DriveLetter$: This is a shared root partition or volume. Shared root partitions and volumes are displayed equally the drive letter name appended with the dollar sign ($). For example, when drive messages C and D are shared, they are shown every bit C$ and D$.
- ADMIN$: It represents a resource mainly used during the remote administration of a computer.
- Print$: Used during the remote assistants of printers.
- FAX$: A shared folder on a server, used by fax clients during fax manual.
To remove administrative shares and prevent them from beingness automatically created in Windows,
1] Using Registry

Please notation that the method involves steps that require you lot how to modify the registry. Nonetheless, serious problems might occur if y'all modify the registry incorrectly. Brand sure that you follow these steps advisedly. For added protection, back up the registry before yous modify it.
Launch the 'Run' dialog box past pressing Win+R in combination.
In the box that appears, blazon 'regedit.exe' and striking 'Enter' central.
Adjacent, in the 'Registry Editor' window that opens, navigate to the post-obit path accost –
HKEY_LOCAL_MACHINE\Organization\CurrentControlSet\Services\LanmanServer\Parameters\AutoShareServer.
Here, the registry subkey 'AutoShareServer' must be set as blazon REG_DWORD.
When its value is prepare to 0 (zero), Windows does not automatically create administrative shares. As such, you'll need to alter this value if it's not set up to '0'. For this, double-click the value to open Edit String box
In the Value data box, type 0, so click OK.
Exit Registry Editor.
One time done, stop and so start the Server service. For this, this,
Again, open up the 'Run' dialog box by pressing Win+R in combination.
In the box that appears, type 'cmd' and so click OK.
When the command prompt window opens, type the following lines. Press Enter subsequently each line:
net stop server
net outset server
Type go out to close the Control Prompt window.
This should fix the problem.
2] Using Ultimate Windows Tweaker
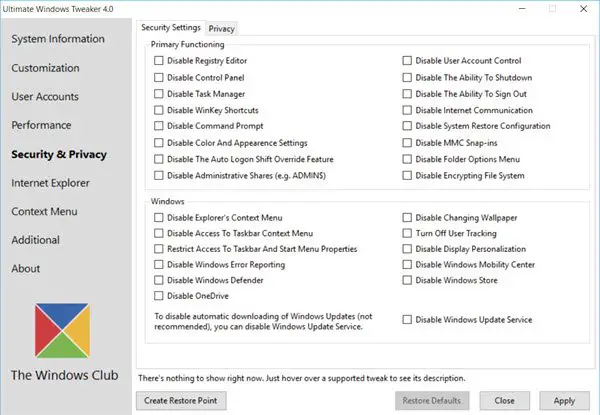
Our freeware Ultimate Windows Tweaker lets you remove administrative shares from Windows in 1 click.
Simply launch the utility, go to Security & Privacy > Security Settings. Here, you can Disable Authoritative Shares.
Hope this helps!

Source: https://www.thewindowsclub.com/how-to-remove-administrative-shares-in-windows-server
Posted by: ricemationsills1950.blogspot.com
0 Response to "Disable Administrative Shares from Windows Server"
Post a Comment