

How To Add Bleed Lines In Photoshop
Photoshop How-To: Calculation Bleeds and Crop Marks
One question that I receive on a fairly regular basis, is how to add together drain to an epitome or project in Photoshop. Both Illustrator and InDesign provide the ability to create a file that contains bleed marks that serve every bit a reference for yous when designing your project. Photoshop on the other manus, seems to be conspicuously missing this feature. Although Photoshop doesn't have a specific bleed setting that can exist applied to a certificate, information technology can however exist accomplished with a little bit of forethought and pre-planning.
What is bleed?
Bleed is a requirement specific to print jobs. You'll never hear someone in the web or video manufacture ask for a file that contains bleed. Whenever you have a project where the final printed advent contains ink that goes to the border of the newspaper, bleed is required. The reason is that printing presses (and even virtually digital printers) cannot print to the border of a slice of paper. In the case of a printing press, information technology technically can impress to the border of the paper, simply the results will be poor. Ink volition build upwardly and create a large ink splotch at the edge of the paper. To avoid this mess, the project must be printed on a larger piece of paper that includes drain (prototype expanse extended past the trim edge) and so trimmed down to produce the final product.
If the project file doesn't contain bleed, you lot run the chance of revealing a white sliver (blank newspaper) along the border of the printed piece, which doesn't look skillful at all. See the effigy beneath for reference. I placed a black border around the project and so you could see the white sliver.

Planning
Regardless of the application y'all utilise, i of the offset things yous demand to determine is the finished size of the printed slice. Preferably you'll do this at the very beginning of the projection instead of at the end, because sometimes at the stop of your projection, you lot've already removed valuable image information that you would need to create the bleed. Standard bleed in the printing industry is ane/8″ just it's a skilful idea to bank check with your printer to be sure. Some projects (like perfect bound books and banners) often require a larger bleed. When in dubiety, ask!
Create the document
Begin by creating a new document in Photoshop to the trim size (final size) and resolution that you need. Y'all tin can also brainstorm with an existing project and implement the techniques that I describe here, but I observe that it's easiest to sympathize if you lot start with a new document.
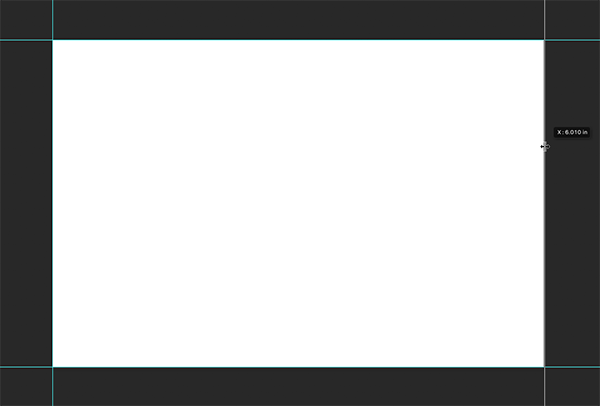
Make sure that rulers are displayed by choosing View > Rulers, and likewise make sure that snapping is enabled by choosing View > Snap. Click on the ruler and drag a guide to the border of the document. The guide should snap to the edge of the document automatically. Practice this for all four sides of the certificate.
Create space for the drain
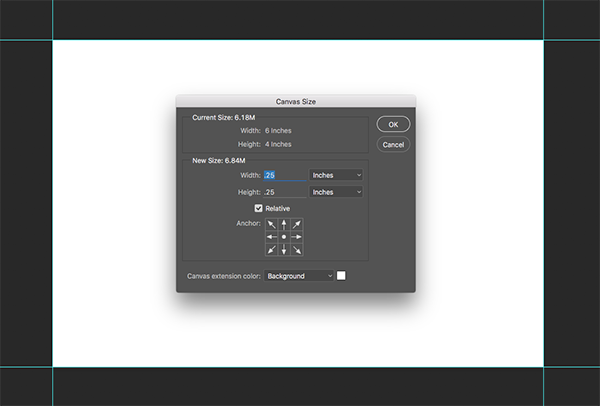
Now increase the image size (document size) to the size of the projection including the drain. Using some basic math, y'all tin determine that if your desired bleed amount is ane/8″ on all four sides, simply add 1/8″ to each dimension.
In this example, nosotros're working with a 6″ x 4″ document so nosotros'll add the 1/8″ amount to all 4 sides to come upwards with 4 i/4″ x half-dozen i/4″.
If your project requires more 1/8″ bleed, simply add that amount. To achieve this, choose Image > Canvas Size and change to dimensions to the correct corporeality. Brand sure that the anchor at the bottom of the dialog box is set to the center to strength the certificate to add pixels from the middle out.
Another option is to cull the relative checkbox and enter the amount that you want to increase your certificate past. In this case, it'southward one/4″. Your canvas extension color can remain the groundwork colour unless you lot want the added corporeality to exist a dissimilar color.
When yous're finished, you should cease up with a document that is to the bleed size of your last project and guides indicating where the document volition trim.

Building the project
Now that yous have the foundation for the document created, simply build the document as desired using the guides as a reference point. Keep in mind that the final printed slice will be trimmed at the location of the guides in the Photoshop document. Annihilation that bleeds will need to extend by the guides (the trim border) to the bleed border.
Feel complimentary to use layers, shapes, and annihilation else that you usually use to produce the concluding production in Photoshop. I find Smart Objects to exist particularly useful equally they retain the original size of the content so you tin adjust things later on on.
You can as well make use of the new Artboards feature in Photoshop to make this procedure even easier just that's for another post ;-)
What most trim marks?
The file that we've created so far is pretty much all the printer should demand. Nonetheless there might be times for one reason or another, that you'll want trim marks that go along with the file that bespeak exactly where the project should be trimmed.
Because of how we prepared the file, we'll simply make the canvas size even larger to provide room for the marks. Choose Prototype > Canvas Size and enable the relative push button. Enter 1″ in the Width and Peak dimensions and click OK. This will expand the sheet past an additional 1″ in both dimensions. Create a new layer for your marks and create a selection in the corner areas of the epitome using the Rectangular Marquee tool. Y'all can do all four corners at the same time.

With the selections active, choose Edit > Stroke and apply a 2px stroke to the active selections. Deselect the active selections and hibernate your guides to view the crop marks applied to the projection.
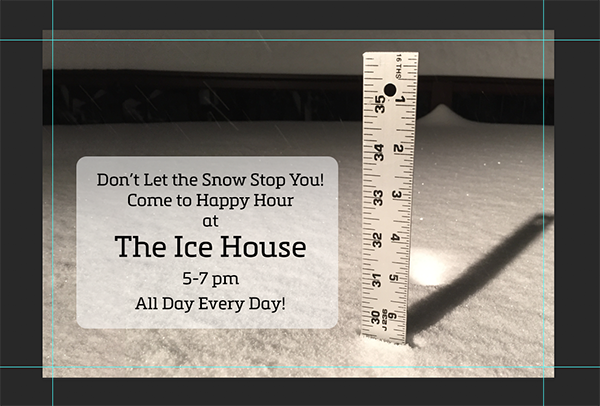
In the figure below, I shortened the crop marks as my preference but you now take a project built in Photoshop that contains the correct amount of bleed and trim marks indicating where the final piece should be trimmed.

Source: https://creativepro.com/photoshop-how-to-adding-bleeds-and-crop-marks/
Posted by: ricemationsills1950.blogspot.com
0 Response to "How To Add Bleed Lines In Photoshop"
Post a Comment